Asus BM1845 Manuel d'utilisateur
Naviguer en ligne ou télécharger Manuel d'utilisateur pour Ordinateurs Asus BM1845. Asus BM1845 User Manual [en] Manuel d'utilisatio
- Page / 96
- Table des matières
- DEPANNAGE
- MARQUE LIVRES
Noté. / 5. Basé sur avis des utilisateurs
- ASUS Desktop PC 1
- Second Edition 2
- October 2012 2
- Contents 3
- Notices 5
- VCCI Class B Statement 6
- KC: Korea Warning Statement 6
- RF Equipment Notices 7
- Safety information 8
- Where to nd more information 9
- Package contents 10
- Chapter 1 11
- BM1645/MD250 13
- Rear panel 14
- 6, or 8-channel conguration 16
- 16 Chapter 1: Getting started 16
- Setting up your computer 17
- Connecting the power cord 18
- Turning your computer ON/OFF 19
- 20 Chapter 1: Getting started 20
- Chapter 2 21
- Using Windows 22
- 7 desktop 22
- ASUS BM1845, BM1645/MD250 23 23
- Using the notication area 24
- Explorer 24
- Exploring les and folders 25
- Arranging your les 25
- Sorting your les 25
- Grouping your les 25
- Adding a new folder 26
- Backing up your les 26
- Protecting your computer 27
- Getting Windows 28
- Help and Support 28
- Chapter 3 29
- Using the Windows 30
- Hotspots 31
- 32 Chapter 3: Using Windows 32
- Working with Windows 33
- Accessing the All Apps screen 34
- Charms bar 35
- Inside the Charms bar 36
- Snap feature 37
- Other keyboard shortcuts 38
- ASUS BM1845, BM1645/MD250 39 39
- Entering the BIOS Setup 40
- Chapter 4 41
- Connecting Headphone and Mic 43
- Connecting 2-channel Speakers 44
- Connecting 4-channel Speakers 44
- Connecting 8-channel Speakers 45
- Connecting 6-channel Speakers 45
- Chapter 5 47
- Inserting an optical disc 48
- Removing an optical disc 48
- ASUS BM1845, BM1645/MD250 49 49
- Chapter 6 51
- RJ-45 cable 52
- ASUS BM1845, BM1645/MD250 53 53
- ASUS BM1845, BM1645/MD250 55 55
- ASUS BM1845, BM1645/MD250 57 57
- Chapter 7 59
- The Tool menu 60
- ASUS BM1845, BM1645/MD250 61 61
- The Monitor menu 63
- The Update menu 63
- The System Information screen 65
- The Settings screen 65
- The Support screen 65
- ASUS WebStorage 66
- Settings 67
- ASUS WebStorage main screen 68
- Working with ASUS WebStorage 68
- Backed-up Data 70
- My Collection 71
- ASUS BM1845, BM1645/MD250 73 73
- Recent changes 74
- Recent photos 75
- Recent music 76
- My shared link 77
- ASUS BM1845, BM1645/MD250 79 79
- Recovering your system 80
- Recovery options on Windows 81
- ASUS Easy Update 83
- ASUS Secure Delete 84
- ASUS BM1845, BM1645/MD250 85 85
- Installing Nero 9 86
- Burning les 86
- Chapter 8 87
- No display on the monitor 88
- From the Start screen 89
- From the Desktop Mode screen 89
- 90 Chapter 8: Troubleshooting 90
- Problem Possible Cause Action 91
- ASUS contact information 95
Résumé du contenu
Page 1 - ASUS Desktop PC
ASUS Desktop PCBM1845, BM1645/MD250User ManualBM1845BM1645/MD250
Page 2 - October 2012
10ASUS Desktop PC Keyboard x1 Mouse x1Power cord x1 Support DVD x1 (Optional) Recovery DVD x1 (Optional)Installation GuideNero 9 burning softwareDVD x
Page 3 - Contents
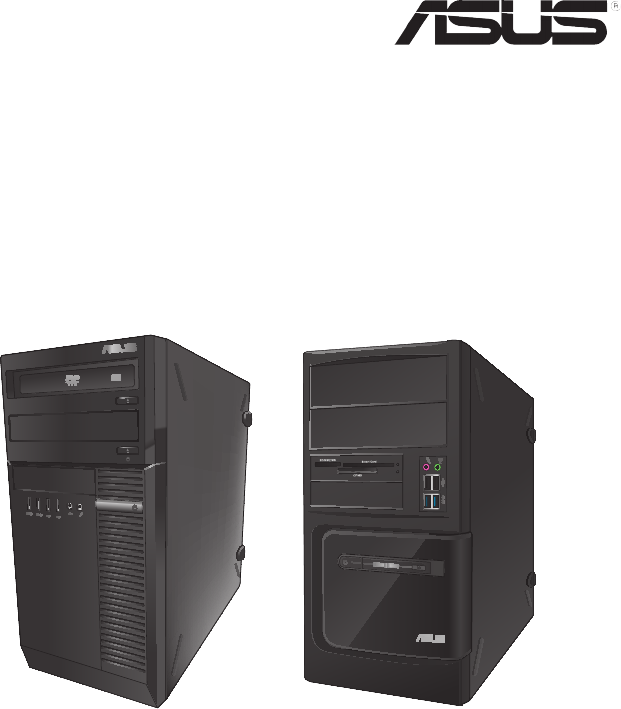
Getting to know your computerIllustrations are for reference only. The ports and their locations, and the chassis color vary with different models.Wel
Page 4
Optical disk drive. The optical disk drive supports DVD-RW / CD-RW / DVD-ROM.Optical disk drive eject button. Press this button to eject the optical d
Page 5 - Notices
BM1645/MD250Front panel37496821510Front USB 2.0 port 6Front USB 3.0 port 3Front USB 3.0 port 4Front USB 2.0 port 5Card Reader slots2 x 5.25 inch optic
Page 6 - KC: Korea Warning Statement
Rear panelDVIHDMI13451012962119720161513 1714181128Rear USB 2.0 port 2Rear USB 3.0 port 1Rear USB 3.0 port 2Rear USB 2.0 port 1Rear USB 2.0 port 4Rear
Page 7 - RF Equipment Notices
LAN port LED indicationsAir vents. These vents allow air ventilation.DO NOT block the air vents on the chassis. Always provide proper ventilation fo
Page 8 - Safety information
Audio 2, 4, 6, or 8-channel congurationPortHeadset 2-channel4-channel 6-channel 8-channelLight Blue Line In Line In Line In Line InLime Line Out Fr
Page 9 - Where to nd more information
Setting up your computerThis section guides you through connecting the main hardware devices, such as the external monitor, keyboard, mouse, and power
Page 10 - Package contents
Connecting a USB keyboard and a USB mouseConnect a USB keyboard and a USB mouse to the USB ports on the rear panel of your computer.DVIHDMIConnecting
Page 11 - Chapter 1
Turning your computer ON/OFFThis section describes how to turn on/off your computer after setting up your computer.Turning your computer ONTo turn you
Page 12
2Copyright © 2012 ASUSTeK Computer Inc. All Rights Reserved.No part of this manual, including the products and software described in it, may be reprod
Page 13 - BM1645/MD250
20 Chapter 1: Getting startedENGLISHENGLISH
Page 14 - Rear panel
ENGLISHENGLISHASUS BM1845, BM1645/MD250 21Chapter 2Using Windows® 7Starting for the rst timeWhen you start your computer for the rst time, a series
Page 15
22 Chapter 2: Using Windows® 7ENGLISHENGLISHENGLISHENGLISHUsing Windows® 7 desktopUsing the Start menuThe Start menu gives you access to programs, uti
Page 16 - 16 Chapter 1: Getting started
ENGLISHENGLISHASUS BM1845, BM1645/MD250 23ENGLISHENGLISHPinning items on the jumplistsWhen you right-click an icon on the taskbar, a jumplist launches
Page 17 - Setting up your computer
24 Chapter 2: Using Windows® 7ENGLISHENGLISHENGLISHENGLISHUsing the notication areaBy default, the notication area shows these three icons:Action Ce
Page 18 - Connecting the power cord
ENGLISHENGLISHASUS BM1845, BM1645/MD250 25ENGLISHENGLISHExploring les and foldersTo explore les and folders:1. Launch Windows® Explorer.2. From th
Page 19 - Turning your computer ON/OFF
26 Chapter 2: Using Windows® 7ENGLISHENGLISHENGLISHENGLISHAdding a new folderTo add a new folder:1. Launch Windows Explorer.2. From the toolbar, cli
Page 20 - 20 Chapter 1: Getting started
ENGLISHENGLISHASUS BM1845, BM1645/MD250 27ENGLISHENGLISHProtecting your computerUsing Windows® 7 Action CenterWindows® 7 Action Center provides you wi
Page 21 - Chapter 2
28 Chapter 2: Using Windows® 7ENGLISHENGLISHSetting up a user’s passwordTo set up a user’s password:1. Select the user that you would like to set a p
Page 22 - 7 desktop
ENGLISHENGLISHASUS BM1845, BM1645/MD250 29Chapter 3Using Windows® 8Starting for the rst timeWhen you start your computer for the rst time, a series
Page 23 - ASUS BM1845, BM1645/MD250 23
3ContentsNotices ... 5Safety information ...
Page 24 - Explorer
30 Chapter 3: Using Windows® 8ENGLISHENGLISHENGLISHENGLISHUsing the Windows® UIThe Windows® User Interface (UI) is the tile-based display used in Wind
Page 25 - Grouping your les
ENGLISHENGLISHASUS BM1845, BM1645/MD250 31ENGLISHENGLISHHotspotsOnscreen hotspots allow you to launch programs and access the settings of your Desktop
Page 26 - Backing up your les
32 Chapter 3: Using Windows® 8ENGLISHENGLISHENGLISHENGLISHHotspot Actionupper left corner Hover your mouse pointer then click on the recent app’s thum
Page 27 - Protecting your computer
ENGLISHENGLISHASUS BM1845, BM1645/MD250 33ENGLISHENGLISHWorking with Windows® appsUse your Desktop PC’s keyboard or mouse to launch and customize your
Page 28 - Help and Support
34 Chapter 3: Using Windows® 8ENGLISHENGLISHENGLISHENGLISHAccessing the All Apps screenFrom the All Apps screen, you can congure an apps settings or
Page 29 - Chapter 3
ENGLISHENGLISHASUS BM1845, BM1645/MD250 35ENGLISHENGLISHCharms barThe Charms bar is a toolbar that can be triggered on the right side of your screen.
Page 30 - Using the Windows
36 Chapter 3: Using Windows® 8ENGLISHENGLISHENGLISHENGLISHInside the Charms barSearch This tool allows you to look for les, applications, or programs
Page 31 - Hotspots
ENGLISHENGLISHASUS BM1845, BM1645/MD250 37ENGLISHENGLISHSnap featureThe Snap feature displays two apps side-by-side, allowing you to work or switch be
Page 32 - 32 Chapter 3: Using Windows
38 Chapter 3: Using Windows® 8ENGLISHENGLISHENGLISHENGLISHOther keyboard shortcutsUsing your keyboard, you can also use the following shortcuts to hel
Page 33 - Working with Windows
ENGLISHENGLISHASUS BM1845, BM1645/MD250 39ENGLISHENGLISH �Launches the magnier and zooms in your screen. �-Zooms out your screen. �,Allow
Page 34 - Accessing the All Apps screen
4ContentsConguring the HDD security setting using the BIOS ... 50Chapter 6 Connecting to the InternetWired connection
Page 35 - Charms bar
40 Chapter 3: Using Windows® 8ENGLISHENGLISHEntering the BIOS SetupBIOS (Basic Input and Output System) stores system hardware settings that are neede
Page 36 - Inside the Charms bar
Connecting a USB storage deviceThis desktop PC provides USB 2.0/1.1 ports on both the front and rear panels. The USB ports allow you to connect USB de
Page 37 - Snap feature
DO NOT remove a USB storage device when data transfer is in progress. Doing so may cause data loss or damage the USB storage device.To remove a USB st
Page 38 - Other keyboard shortcuts
Connecting microphone and speakersThis desktop PC comes with microphone ports and speaker ports on both the front and rear panels. The audio I/O ports
Page 39 - ASUS BM1845, BM1645/MD250 39
Connecting 2-channel SpeakersConnecting 4-channel Speakers44 Chapter4: Connecting devices to your computerENGLISHENGLISHENGLISHENGLISH
Page 40 - Entering the BIOS Setup
Connecting 8-channel SpeakersConnecting 6-channel SpeakersENGLISHENGLISHASUS BM1845, BM1645/MD250 45ENGLISHENGLISH
Page 41 - Chapter 4
46 Chapter4: Connecting devices to your computerENGLISHENGLISH
Page 42
ENGLISHENGLISHASUS BM1845, BM1645/MD250 47Chapter 5Using your computerProper posture when using your Desktop PCWhen using your Desktop PC, maintaining
Page 43 - Connecting Headphone and Mic
Using the optical drive (on selected models only)Inserting an optical discTo insert an optical disc:1. While your system is on, press the eject butto
Page 44 - Connecting 4-channel Speakers
Conguring the USB ports using the BIOSYou can enable or disable the front and rear USB 2.0 and USB 3.0 ports from the BIOS Setup.To disable or enable
Page 45 - Connecting 6-channel Speakers
5Notices ASUS Recycling/Takeback ServicesASUS recycling and takeback programs come from our commitment to the highest standards for protecting our env
Page 46
50 Chapter 5: Using your computerENGLISHENGLISHConguring the HDD security setting using the BIOSYou can set a password in the BIOS Setup to protect y
Page 47 - Chapter 5
Connecting via a DSL/cable modemTo connect via a DSL/cable modem:1. Set up your DSL/cable modem.Wired connectionUse an RJ-45 cable to connect your co
Page 48 - Removing an optical disc
Connecting via a local area network (LAN)To connect via a LAN:1. Connect one end of an RJ-45 cable to the LAN (RJ-45) port on the rear panel of your
Page 49 - ASUS BM1845, BM1645/MD250 49
Conguring the network connectionConguration options on Windows® 7Conguring a dynamic IP/PPPoE network connection To congure a dynamic IP/PPPoE net
Page 50
Continue to the next steps if you are using PPPoE connection.9. Select Connect to the Internet and click Next.8. Return to the Network and Sharing C
Page 51 - Chapter 6
11. Enter your User name and, Password, and Connection name. Click Connect.12. Click Close to nish the conguration.13. Click the network icon in
Page 52 - RJ-45 cable
Conguration options on Windows® 8Conguring a dynamic IP/PPPoE network connectionTo congure a dynamic IP/PPPoE network connection:1. From the Start
Page 53 - ASUS BM1845, BM1645/MD250 53
6. Click Obtain an IP address automatically and click OK.Continue to the next steps if you are using PPPoE connection.8. Select Connect to the Inter
Page 54
9. Select Broadband (PPPoE) and click Next.10. Enter your User name and, Password, and Connection name. Click Connect.11. Click Close to nish the
Page 55 - ASUS BM1845, BM1645/MD250 55
ASUS AI Suite IIASUS AI Suite II is an all-in-one interface that integrates several ASUS utilities and allows users to launch and operate these utilit
Page 56
6IC: Canadian Compliance StatementComplies with the Canadian ICES-003 Class B specications. This device complies with RSS210 of Industry Canada. This
Page 57 - ASUS BM1845, BM1645/MD250 57
The Tool menuThe Tool menu includes the EPU, Probe II, and Sensor Recorder panels.Launching and conguring EPUEPU is an energy-efcient tool that prov
Page 58
Launching and conguring Probe IIProbe II is a utility that monitors the computer’s vital components, and detects and alerts you of any problem with t
Page 59 - Chapter 7
Launching and conguring Sensor RecorderSensor Recorder allows you to monitor the changes in the system voltage, temperature, and fan speed, as well a
Page 60 - The Tool menu
Launching SensorThe Sensor panel displays the current value of a system sensor such as fan rotation, CPUdisplays the current value of a system sensor
Page 61 - ASUS BM1845, BM1645/MD250 61
Updating the BIOS through a BIOS leTo update the BIOS through a BIOS le:1. From the ASUS Update screen, select Update BIOS from le, then click Nex
Page 62
The System Information screenThe System Information screen displays the information about the motherboard, CPU, and memory slots.• Click the MB tab t
Page 63 - The Update menu
66 Chapter 7: Using the utilitiesENGLISHENGLISHENGLISHENGLISHASUS WebStorageASUS WebStorage is storage app and a cloud service that allow you to save,
Page 64
ENGLISHENGLISHASUS BM1845, BM1645/MD250 67ENGLISHENGLISH• MyS yncFo lde r Allows you to store your les to MySyncFolder for easy access and sharing
Page 65 - The Support screen
68 Chapter 7: Using the utilitiesENGLISHENGLISHENGLISHENGLISHLaunching WebStorage on Windows® 8Do either of the following to launch WebStorage on Wind
Page 66 - ASUS WebStorage
ENGLISHENGLISHASUS BM1845, BM1645/MD250 69ENGLISHENGLISHAdding les to MySyncFolderTo add les to MySyncFolder:1. Right-click on the screen to launch
Page 67 - Settings
7RF Equipment NoticesCE: European Community Compliance StatementThe equipment complies with the RF Exposure Requirement 1999/519/EC, Council Recommend
Page 68 - Working with ASUS WebStorage
70 Chapter 7: Using the utilitiesENGLISHENGLISHENGLISHENGLISHBacked-up DataThis folder allows you to open the les that you backed up from your comput
Page 69
ENGLISHENGLISHASUS BM1845, BM1645/MD250 71ENGLISHENGLISHMy CollectionThis folder allows you to upload your favorite contents without the need of synci
Page 70 - Backed-up Data
72 Chapter 7: Using the utilitiesENGLISHENGLISHENGLISHENGLISHCustomizing contents in My Collection folderYou can customize your contents in this folde
Page 71 - My Collection
ENGLISHENGLISHASUS BM1845, BM1645/MD250 73ENGLISHENGLISHStarredThis folder allows you to easily access and view contents that you have tagged as favor
Page 72
74 Chapter 7: Using the utilitiesENGLISHENGLISHENGLISHENGLISHRecent changesThis folder allows you to view the contents saved in MySyncFolder, Backed-u
Page 73 - ASUS BM1845, BM1645/MD250 73
ENGLISHENGLISHASUS BM1845, BM1645/MD250 75ENGLISHENGLISHRecent photosThis folder allows you to view the photos saved in MySyncFolder, Backed-up Data a
Page 74 - Recent changes
76 Chapter 7: Using the utilitiesENGLISHENGLISHENGLISHENGLISHRecent musicThis folder allows you to view the music les saved in Backed-up Data and My
Page 75 - Recent photos
ENGLISHENGLISHASUS BM1845, BM1645/MD250 77ENGLISHENGLISHMy shared linkThis folder allows you to view and access the contents that you linked in ASUS W
Page 76 - Recent music
ASUS Smart Cooling System (optional)ASUS Smart Cooling System is an optional feature on selected models and may be purchased separately.Conguring the
Page 77 - My shared link
During the system reboot, the Power LED ashes to indicate that the dust extraction fan rotates in reverse to remove the dust from the internal system
Page 78
8Safety informationDisconnect the AC power and peripherals before cleaning. Wipe the Desktop PC using a clean cellulose sponge or chamois cloth dampen
Page 79 - ASUS BM1845, BM1645/MD250 79
Recovering your systemRecovery options on Windows® 7Using the system recovery partition The system recovery partition quickly restores your Desktop PC
Page 80 - Recovering your system
4. Select OK to conrm the system recovery.Restoring will overwrite your hard drive. Ensure to back up all your important data before the system reco
Page 81 - Recovery options on Windows
Removing everything and reinstalling WindowsRestoring your PC to its original factory settings can be done using the Remove everything and reinstall o
Page 82
ASUS Easy UpdateASUS Easy Update is a software tool that automatically detects the latest drivers and applications for your system.1. From the Window
Page 83 - ASUS Easy Update
ASUS Secure DeleteASUS Secure Delete makes deleted les completely irrecoverable via a simple drag-and-drop interface, thus enhancing your data securi
Page 84 - ASUS Secure Delete
4. Tick Delete the les listed in the recycle bin if you want to permanently delete all the les in the recycle bin. 5. Click Clear, and then click
Page 85 - ASUS BM1845, BM1645/MD250 85
Nero 9 Nero 9 allows you to create, copy, burn, edit, share, and update different kinds of data.Installing Nero 9To install Nero 9:1. Insert the Nero
Page 86 - Burning les
ENGLISHENGLISHASUS BM1845, BM1645/MD250 87Chapter 8TroubleshootingTroubleshootingThis chapter presents some problems you might encounter and the possi
Page 87 - Chapter 8
88 Chapter 8: TroubleshootingENGLISHENGLISHENGLISHENGLISH?The arrow keys on the number key pad are not working. Check if the Number Lock LED is off.
Page 88 - No display on the monitor
ENGLISHENGLISHASUS BM1845, BM1645/MD250 89ENGLISHENGLISH?I want to restore or undo changes to my computer’s system settings without affecting my perso
Page 89 - From the Desktop Mode screen
9Conventions used in this guideTo ensure that you perform certain tasks properly, take note of the following symbols used throughout this manual. D
Page 90 - 90 Chapter 8: Troubleshooting
90 Chapter 8: TroubleshootingENGLISHENGLISHENGLISHENGLISH?My speakers produce no sound. • Ensure that you connect your speakers to the Line out port
Page 91 - Problem Possible Cause Action
ENGLISHENGLISHASUS BM1845, BM1645/MD250 91ENGLISHENGLISHPowerProblem Possible Cause ActionNo power (The power indicator is off)Incorrect power voltag
Page 92
92 Chapter 8: TroubleshootingENGLISHENGLISHENGLISHENGLISHLANProblem Possible Cause ActionCannot access the InternetThe LAN cable is not connected.Conn
Page 93
ENGLISHENGLISHASUS BM1845, BM1645/MD250 93ENGLISHENGLISHSystemProblem Possible Cause ActionSystem speed is too slowToo many programs are running.Close
Page 94
94 Chapter 8: TroubleshootingENGLISHENGLISHENGLISHENGLISHCPUProblem Possible Cause ActionToo noisy right after turning on the computer.Your computer i
Page 95 - ASUS contact information
ENGLISHENGLISHASUS BM1845, BM1645/MD250 95ENGLISHENGLISHASUS contact informationASUSTeK COMPUTER INC.Address 15 Li-Te Road, Peitou, Taipei, Taiwa
Plus de documents pour Ordinateurs Asus BM1845

Asus BM1845 Manuel d'utilisateur
(96 pages)

Asus BM1845 Manuel d'utilisateur
(644 pages)

Asus BM1845 Manuel d'utilisateur
(78 pages)

Asus BM1845 Manuel d'utilisateur
(64 pages)

Asus BM1845 Manuel d'utilisateur
(94 pages)
Produits connexes et manuels pour Ordinateurs Asus BM1845
Ordinateurs Asus CM5425 Manuel d'utilisateur
 (22 pages)
(22 pages)
Ordinateurs Asus M70AD Manuel d'utilisateur
 (81 pages)
(81 pages)
Ordinateurs Asus P1-PH1 Manuel d'utilisateur
(88 pages)
(88 pages)
Ordinateurs Asus E500-PV Manuel d'utilisateur
(104 pages)
(104 pages)
Ordinateurs Asus P1801 Manuel d'utilisateur
(64 pages)
(64 pages)
Ordinateurs Asus CM6731 Manuel d'utilisateur


 (480 pages)
(480 pages)
Ordinateurs Asus G70AB Manuel d'utilisateur
(84 pages)
(84 pages)
Ordinateurs Asus CG8270 Manuel d'utilisateur
(72 pages)
(72 pages)
Ordinateurs Asus CG8265 Manuel d'utilisateur
(350 pages)
(350 pages)
Ordinateurs Asus V2-AH2 Manuel d'utilisateur
(56 pages)
(56 pages)
© 2020, manymanuals.fr. Tous droits réservés | 1.901 s |
 Manymanuals.com
 Manymanuals.de
 Manymanuals.fr
 Manymanuals.it
 Manymanuals.pl
 Manymanuals.cz
 Manymanuals.es
 Manymanuals-pt.com
Commentaires sur ces manuels